To backup your files on Windows 10 using System image, having file caution in mind is key, but it doesn’t require you to first land into a data loss ditch in order to embrace backups.
Commonly, Windows 10 allows users to copy and paste files on removable storage like Flashdisks, external hard disks, and optical compact disks (CDs) as a form of secondary data storage.
Well, you don’t need to wait for data corruption alarms in order to leap off the removable devices trend and embrace a full PC backup to have all your Windows 10 file system secured and stored for future use.
In fact, performing a full backup of your files on Windows 10 will help you keep note of every node safe even when you change to another operating system say Mac or Linux.
To backup your files on Windows 10, there are several ways you can consider which include Microsoft’s system Onedrive cloud storage platform, Google Drive, Mega, and other non-cloud solutions that allow you to backup your files for secure and easy access in future.
However, to perform a full Windows 10 backup which includes your files and all operating system, you should consider using the legacy built-in system image backup tool as a path to create recoverable backups that you can further migrate to any other computer to create a clone of your parent machine.
With the System Image backup tool, you have the ability of having a full backup of your computer including settings, apps, emails, files, photos, and game data.
In simple terms, this tool gives you the power to stay a step ahead of any possible hard disk crashes and critical hardware or software failures. Nonetheless, here is how you can backup your files on Windows 10 using the tool.
Backup your Files on Windows 10 Using System Image tool
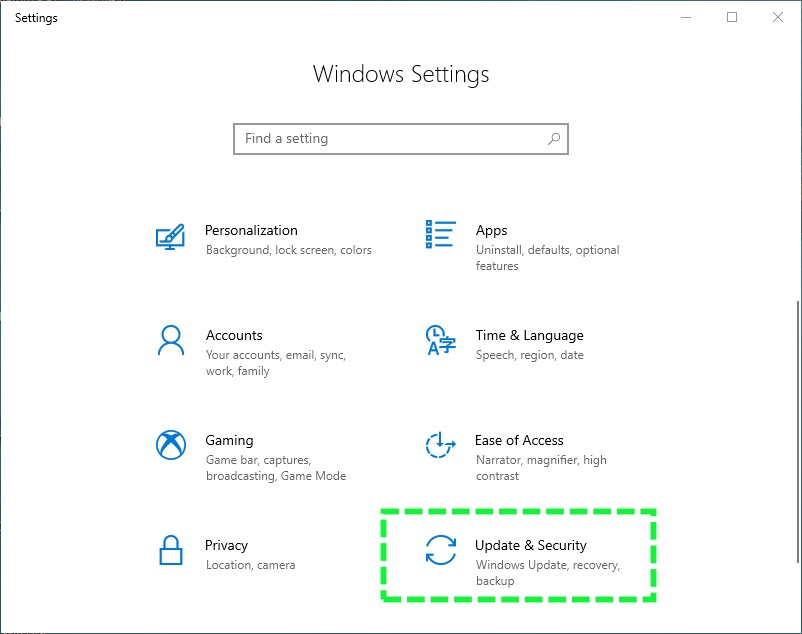
- From your Windows Menu, Open Settings
- Under Settings, click Update & Security

- Then, click Backup
- Under the Looking for an Older Backup section, Click Go to Backup and Restore (Windows 7)
- Legacy control panel will be open, on the left pane, click Create System Image
- Then choose where you wish to save your Windows 10 backup
- If you have an external hard disk connected, Choose on a hard disk, or choose on one or more DVDs to burn your data via optical storage, or else, choose a network server path to backup and upload your files
- Then, click Next to choose disk partitions you wish to include in your Windows 10 backup
- Once done, click Next to preview your backup choices
- Then, click Start Backup
- Your Windows 10 backup will start shortly, close the active Window to have the backup running in the background as you do other tasks on your Computer
- DONE: Once the Backup is completed, remove your backup disk and store it safely for easy access when needed
All in All, data security is very relevant and backups are crucial in making sure your data is safe from any 3rd party interference or usage in any non-authorized forms.
Hence, once you successfully create your backup, safeguard it with extra security which could be a password, or fingerprint scan (on enabled devices). So, with Windows 10, you can back up your files using the built-in system tool and other 3rd party software which includes cloud services like One Drive, Google Drive, iCloud.
But on every backup, always keep in caution how your data will be kept, and how it will be retrieved for future use, otherwise, computers are fond of crashing and a backup will soon be your savior.