

Taking screenshots on Windows is a complex task that often requires you to press the print scrn button on your keyboard. But with the Snipping tool on Windows 11, you can capture screenshots in a much easier fashion. More so, you can now screen record using the Snipping tool on your Windows 11 computer.
Without the Snipping tool, to capture screenshots and screen record on your Windows 11 machine, you need to either use Microsoft Powerpoint or install 3rd party tools such as Snaggit. So, you need to leverage the Snipping tool on Windows 11 because it will get your tasks done in a much easier and faster way.
How to Install and update the Snipping Tool on Windows 11
By default, the Snipping tool is available on Windows 11, but in most cases, it’s not updated to the latest version. This means you may miss out on features like screen recording which make the tool a must-have. So, to install or update the Snipping tool on Windows 11, follow the steps below:
- On the taskbar, click the Windows Menu button.
- Find and click Microsoft Store.
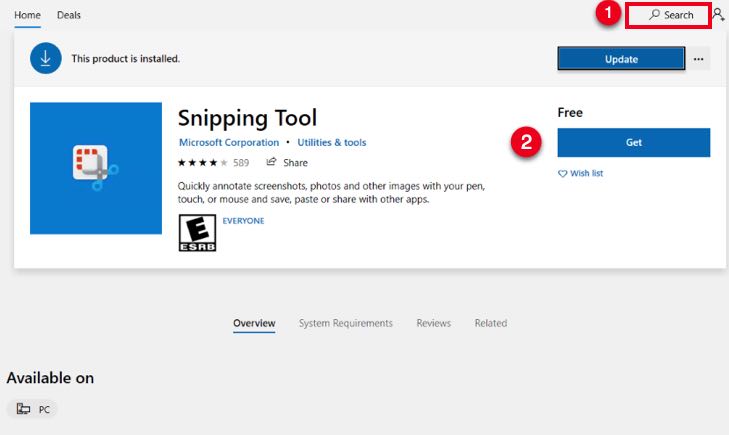
- In the open store window, click the Search button, and enter the keyword `snipping tool` in the search field.
- Click Get to start downloading the Snipping tool to your Windows 11 computer. You may be prompted to sign in to your Microsoft account if not signed in. If the Snipping Tool is already installed on your computer, simply click Update to reinstall a newer version.
- Once installed, click Launch to start the Snipping tool, or, open the Windows menu, click **All Apps**, scroll to the S section, and click open Snipping Tool. Alternatively, simply search for `Snipping Tool`.
- DONE: The Snipping Tool will open your Windows 11 machine.
Use the Snipping Tool
To use the snipping tool on Windows 11, all you need to do is open the tool and follow the steps below to capture a screenshot or screen record on Windows 11.
- Update the Snipping tool to the latest version as described above.
- Open the Snipping tool.
- On the main functions bar, change the capture mode to your desired setting whether Photo or Video.
- Click the Snipping mode button.
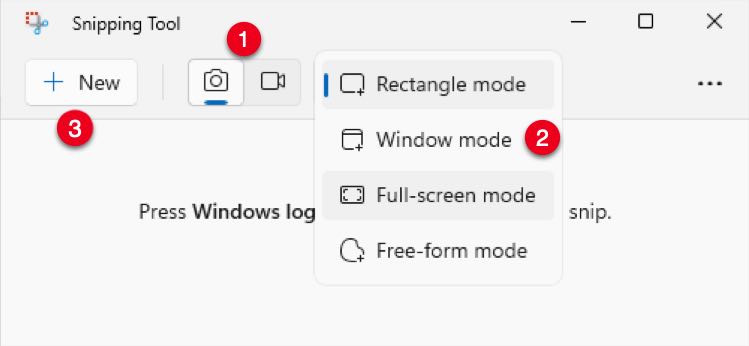
- Set your desired capture method. By default, it’s set to Rectangle Mode, and you can select other options including:
- Rectangle mode – capture in a rectangular snipping area.
- Window mode – capture full application windows, for example, if you have a browser open, the snipping area is set to the full browser.
- Full-screen mode – capture your full computer screen including the taskbar.
- Free-form mode – Change the snipping area to any shape you want for capture. For example, you can change the snipping area to a circle, pentagon, or in any form you want to capture.
- Click New to hide the Snipping tool window, and start capturing your target area. Depending on your capture mode setting, move your mouse by drawing a shape on your screen.
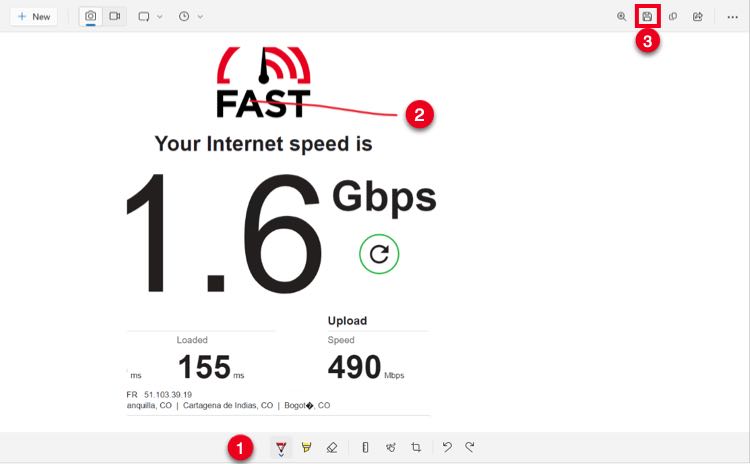
- Once complete, release your mouse (left click) to capture the area, and display it in the Snipping tool.
- Edit your captured screenshot or video using the tools on the bottom bar. Then, click the Save (Floppy disk) icon on the top right bar to save your capture to disk. By default, the Snipping tool saves to the Pictures folder.
- DONE: Enjoy the Snipping Tool on Windows 11.
The Windows Snipping Tool Keyboard Shortcut
To access the Snipping tool by pressing a shortcut on your keyboard, simply hold the Windows Logo button + Shift + S Win + Shift + S to open the Snipping tool on Windows.
FIX: Snipping Tool not working on Windows 11
If the Snipping tool is not working on your Windows 11 computer, please follow the steps below to fix the error:
- Update the Snipping tool to the latest version through the Microsoft store.
- Verify that there no conflicting capture software is installed on your computer. If there is any, make sure it’s not running.
- Change your Snipping capture mode to a different setting, and click New to reset your snipping mode and use the tool again.
For more information about Windows 11 and its features, please visit to the official Microsoft documentation.