Windows 11 is the latest Microsoft operating system that was launched as the long-awaited improvement to Windows 10. Initially, Windows 10 was a blend of Windows 7 and Windows 8.1 designed to give users the much-wanted feeling of an easy-to-use main menu and taskbar style.
Now, with Windows 11, Microsoft anticipates that the operating system will be widely loved by users of all types due to its nature of operation and features installed to it. However, not every computer can run Windows 11 and this has raised concerns from sections of users who feel older PCs deserved a taste of the new-gen operating system.
With a more redefined look, newer features, rebuilt Windows store, ability to run Android apps, and a lot more features, Windows 11 is that ideal Operating system every PC user would want to install. But with new changes comes new ways of performing actions, and by this standard, the old way of checking your computer specifications on Windows is gone.
Over the years, you could check your computer specifications on Windows by simply right-clicking on Windows explorer to locate a system properties panel to access your PC specs. But now, on Windows 11 if you right-click on This PC under File Explorer, you are presented a system settings panel to simply tweak your PC.
So, this brings to book a simple question, how can you check your computer specifications on Windows 11? Well, first things first, Windows 11 encourages the use of the system settings window making it hard for you to access control panel features as the case has been with Windows 10 and earlier operating systems.
Under computer specifications on Windows 11, you are able to see the amount of RAM installed on your PC, type and speed of your central processing unit (CPU), computer name, windows version, among other specs you may need to note, and here is how you can access you computer specifications on Windows 11.
Checking your Computer Specifications on Windows 11
- On your keyboard, press the Windows Logo button, OR click the Windows start option on your Taskbar
- On your main Apps menu (start menu), locate and click Settings
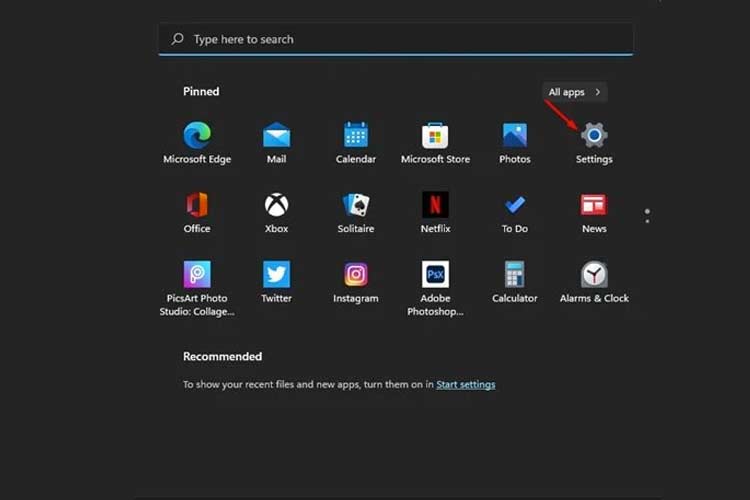
- Under the Settings window, locate and click System
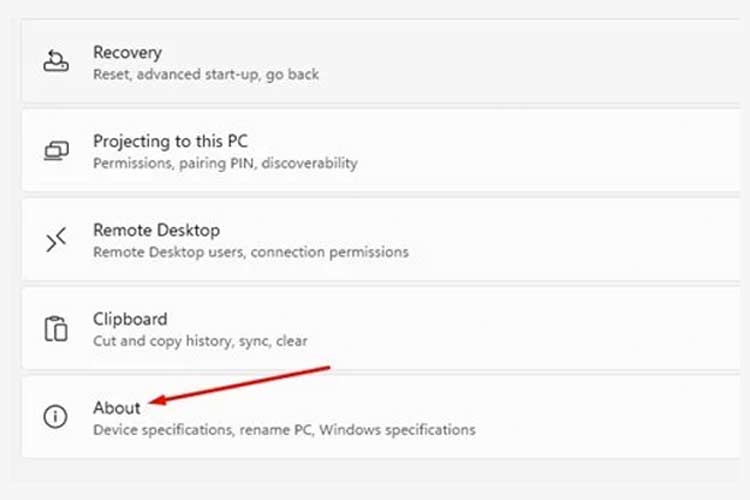
- Now, Scroll down and locate the About option under system settings
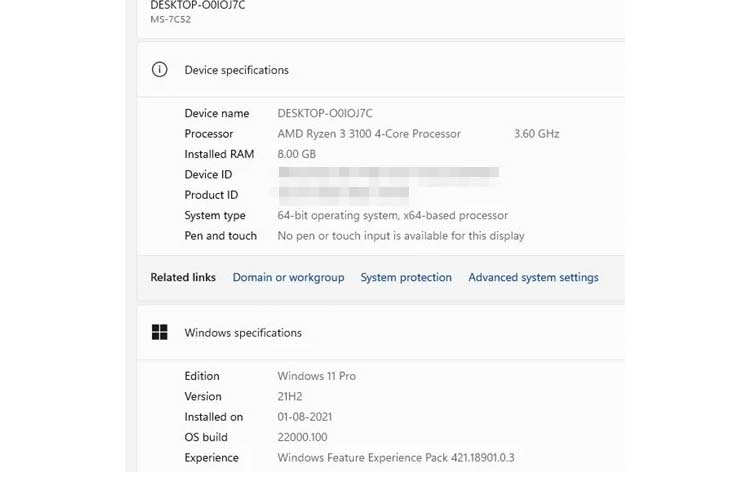
- DONE: You will be presented your Computer’s full specifications and Windows 11 version installed on it.
How to view advanced computer specifications on Windows 11
Unlike the base process of using the settings panel to view your computer specifications on Windows 11, the operating system ships the Direct X inbuilt tool that has been available in all earlier Windows versions. To access it, you’ll need to access the RUN window under which you can enter short commands to execute on Windows 11.
- On your computer keyboard, press the Windows Key Button + R (Win + R)
- This will open a small RUN window
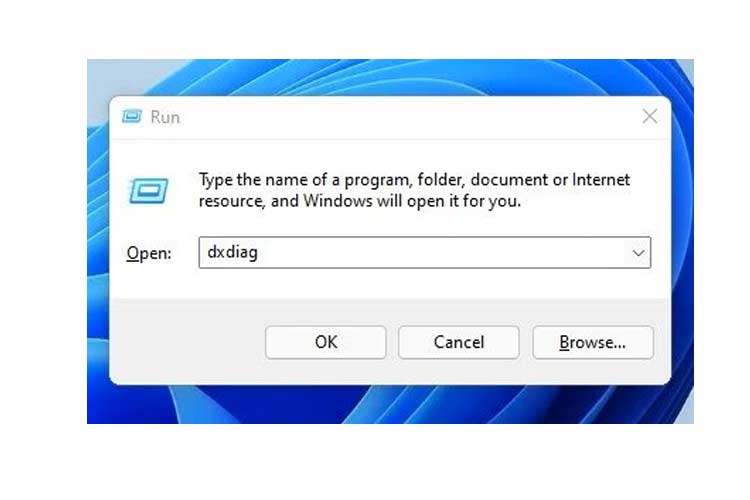
- Now, enter the command ‘dxdialog’ and hit the enter button or simply click OK
- This will open up an advanced system specificons tab where you will view your computer motherboard type, BIOS Version, Processor and other advanced specs.

- DONE: To View your Computer Graphics speficiations on Widnows 11, simply rclick the Display tab in the Direct Diagonisic Tool Window.
All in all, keeping note of your computer specifications on Windows will help you identify the available memory and hardware for your PC. In case of a RAM Chip failure, you will can notice reduction in your total memory under the specifications tab. But with the new procedure of accessing these options, the goal is clear, the Windows control panel is being phased out to pave way for newer features as showcased in Windows 11.