You can use ChatGPT in Microsoft Word and write essays, articles, or documentation without manually flexing your fingers on the keyboard. Because ChatGPT is now integrated in Microsoft’s Bing search engine, being able to use ChatGPT in Microsoft Word is just an added bonus that makes it easier to get tasks complete by leveraging the power of AI.
Well, a developer named Patrick Husting imagined a better way to use ChatGPT in Microsoft Word by embedding the GPT-3 API key to a simple Add-in called Ghostwriter. Upon installation, the Add-in is able read and make changes to your documents, and also send data over the Internet.
In this article, we’ll show you how to use ChatGPT in Microsoft Word to streamline your writing process and improve the quality of your content using the Ghostwriter Add-in.
Step 1: Sign up for OpenAI’s GPT-3 API
To use ChatGPT in Microsoft Word, Ghostwriter requires your personal OpenAI GPT-3 API for integration, if you don’t have one, get one from the OPENAI website. The API gives you access to the AI-powered writing tools required to generate high-quality content. Once acquired, copy and keep your API key.
Step 2: Install the Ghostwriter Microsoft Word Add-in
To install the Ghostwriter Microsoft Word Add-in for ChatGPT, follow the steps below:
- Open Microsoft Word and click the Insert menu tab.
- Find and click Add-ins.
- From the drop-down list, click Get Add-ins.
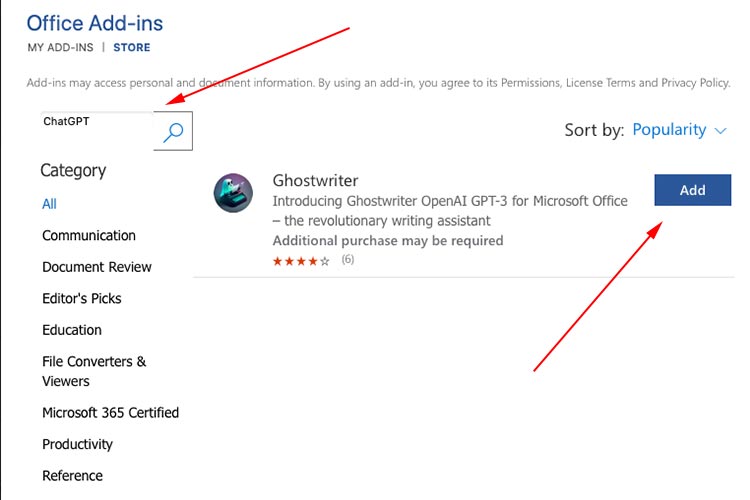
- In the open Office Add-ins dialog window, enter the keyword
GhostwriterorChatGPT, and press Enter to search. - In the search results, click the Add button next to the Ghostwriter result.
- Click Continue to accept the product license terms & privacy policy.
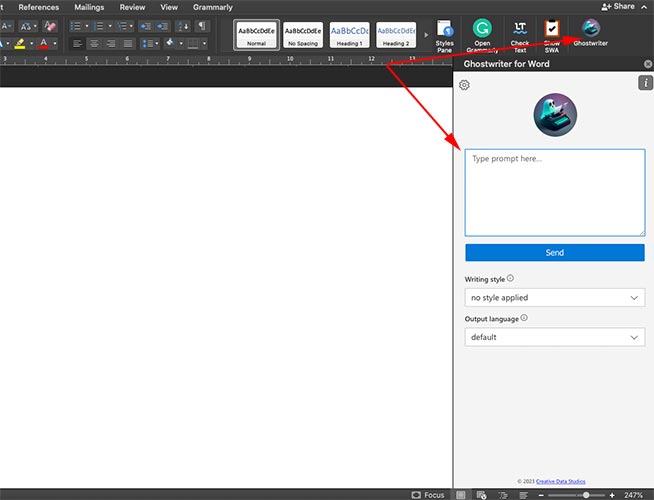
- Wait for the download to complete, once ready, Ghostwriter opens in your right pane, and a new Add-in Icon is added to your Home tab.
- In the Ghostwriter pane, enter your desired ChatGPT prompt, and click Send. Optionally, choose a writing style and your desired output language.
- Enter your OPEN API Key, and click Save to generate your desired content.
- DONE: Once your API Key is correct, ChatGPT generates the output directly to your Microsoft Word document.
Step 3: Start Writing with ChatGPT
Once you’ve installed the Ghostwriter Word Add-In, you are ready-to-use ChatGPT to write documents and other types of content. To use the AI-powered writing tools, simply select the text you want to improve and click the Write with AI button in the Ghostwriter Word Add-In.
Step 4: Customize Your Content
ChatGPT can generate high-quality content quickly, but it’s very important to make sure that the content is customized to match your style and needs. To do this, make sure that you provide the prompt with enough information to generate content that’s relevant to your topic.
You can do this by using keywords, phrases, and other inputs to give ChatGPT a better understanding of what you’re looking for. After all, well written content is easy and understandable to read.
Step 5: Review, Proofread, and Edit Your ChatGPT-generated Content
After generating content, please review, proofread, and edit it to make sure that it meets your desired standards. This can include fixing any grammar or spelling errors, adding additional information, or making any other changes you find necessary.
Additionally, style your work with Fonts and text sizes that best match your needs in order to get the best document quality.
Step 6: Finalize, Print or Publish Your Work
If you are happy with the content generated by ChatGPT in Microsoft Word, you are ready to preview, print or publish it to your desired audience. To do this, simply save the document (Control + S on Windows) and print or share your work.
In conclusion, ChatGPT is an incredibly powerful tool that can help you streamline your writing process and generate high-quality documents easily. By following the steps outlined above, you will use ChatGPT in Microsoft Word all thanks to the Ghostwriter Add-in.


